Difference between revisions of "Divvy Transactions"
From AYSO Wiki
(Add Divvy Transactions page) |
|||
| Line 1: | Line 1: | ||
All transactions should be categorized in Divvy through the web browser or through the mobile app. Each transaction should also have a receipt/invoice saved to the transactions along with a business purpose in the notes. | All transactions should be categorized in Divvy through the web browser or through the mobile app. Each transaction should also have a receipt/invoice saved to the transactions along with a business purpose in the notes. | ||
| − | == | + | == Categorize Transactions (Web browser) == |
* Login to Divvy. | * Login to Divvy. | ||
| Line 39: | Line 39: | ||
| − | == | + | == Categorize Transactions (Mobile App) == |
* Download the mobile app in the App Store on your phone/tablet. | * Download the mobile app in the App Store on your phone/tablet. | ||
* Log in with the same user name and password as the web browser (may require multi-factor authentication) | * Log in with the same user name and password as the web browser (may require multi-factor authentication) | ||
| + | * On Transactions page, select transaction to add receipt. | ||
| + | |||
| + | * Scroll to the bottom of the page and click '''''Add Receipt'''''. | ||
| + | |||
| + | [[File:Categorize transactions 4.png|none|thumb|678x678px]] | ||
| + | |||
| + | * Select file: | ||
| + | |||
| + | * '''''Take Photo''''' | ||
| + | |||
| + | * '''''Choose from photo Library''''' | ||
| + | |||
| + | * '''''Choose from files''''' | ||
| + | ** Enter a '''''Description''''' to complete the transaction. | ||
| + | |||
| + | [[File:Categorize Transaction 5.png|none|thumb|664x664px]] | ||
| + | |||
| + | |||
| + | To '''Delete file''': | ||
| + | |||
| + | * Select image. | ||
| + | |||
| + | * Click on '''three dots''' and select '''''Delete file'''''. | ||
| + | |||
| + | [[File:Categorize transaction 6.png|none|thumb]] | ||
| + | |||
| + | == See Also == | ||
| + | |||
| + | * Splitting Transaction Categories | ||
| + | * Exporting Transactions | ||
| + | * | ||
| + | |||
* | * | ||
Revision as of 02:13, 6 July 2022
All transactions should be categorized in Divvy through the web browser or through the mobile app. Each transaction should also have a receipt/invoice saved to the transactions along with a business purpose in the notes.
Categorize Transactions (Web browser)
- Login to Divvy.
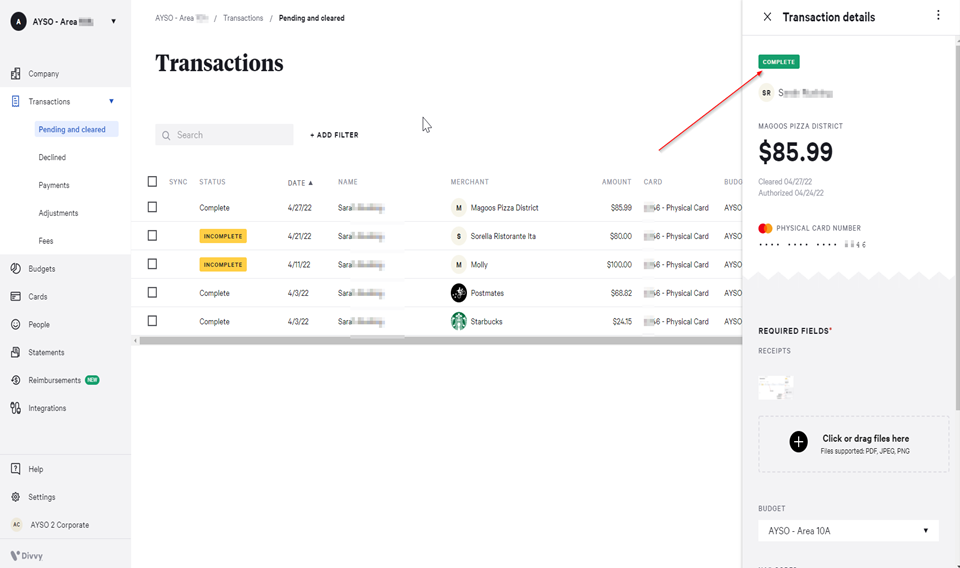
- Click on Transactions:
- Complete - The transaction is coded, and the receipts or invoices have been uploaded.
- Incomplete - The transaction is missing NAP code(s) and must uploaded receipts or invoices
- Incomplete transactions appear highlighted in yellow
Select an incomplete transaction to get started
Receipts:
Click on the + Plus sign, add receipts/invoices/reimbursement documents or drag files to this section for uploading.
Budget:
Click on the drop down arrow, select budget.
NAP Codes (Account Categories):
Click on the drop down arrow, select your NAP Code(s)
Notes:
Enter description, notes, memo related to the transaction.
Once all fields are completed click on Complete.
Categorize Transactions (Mobile App)
- Download the mobile app in the App Store on your phone/tablet.
- Log in with the same user name and password as the web browser (may require multi-factor authentication)
- On Transactions page, select transaction to add receipt.
- Scroll to the bottom of the page and click Add Receipt.
- Select file:
- Take Photo
- Choose from photo Library
- Choose from files
- Enter a Description to complete the transaction.
To Delete file:
- Select image.
- Click on three dots and select Delete file.
See Also
- Splitting Transaction Categories
- Exporting Transactions


